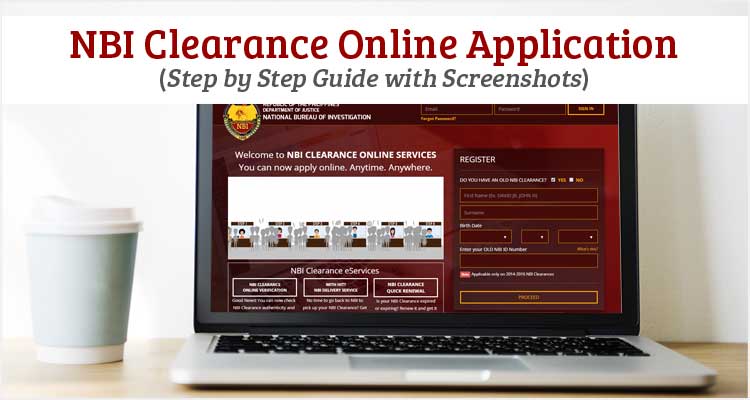
NBI Clearance Online Application is a new implemented system to get an NBI Clearance faster, easier and more convenient to applicants. With just a computer and an internet connection, an applicant may conveniently apply for an NBI Clearance Online 2021.
The National Bureau of Investigation Clearance or NBI Clearance is one of the most known clearances in the Philippines needed by the citizens in different purposes it may serve. It is mainly used as a reference by hiring companies or organizations to check if its holder has no criminal records in the entire country.
On the last quarter of the year 2017, NBI started distributing a Multi-Purpose NBI Clearance. It means that it can be used in any transactions and specific purposes has been removed. It may be used for local employment and at the same time, it may also be used for travel abroad, passport application and several others.
NBI Clearance Application Before and Today
Most of the applicants who have experienced the situation on getting an NBI Clearance before surely appreciates the new NBI Clearance Online Application system. It’s easier to apply online and to pay for the clearance fee at the selected payment option.
However, personal appearance to the National Bureau of Investigation branch or center is still necessary for the biometric fingerprint scanning, photo capturing and getting the NBI Clearance.
It takes only 51 seconds to watch this video from NBI that clearly shows the new easy steps in NBI Clearance Online Application.
Sometimes the NBI Server runs slow making this video load slow as well. Alternatively, you can watch it on Vimeo.
NBI Clearance Requirements
- The printed NBI form with Reference Number (final output of NBI Online Application)
- Receipt of Payment (if applicable)
- 2 Valid IDs (Valid Passport, Voter’s ID, Driver’s Licence, SSS ID, TIN ID, UMID ID, School ID, Postal ID, NSO Birth Certificate, etc.)
NBI Clearance Fee
The request for an NBI Clearance only costs ₱130.
NBI CLEARANCE ADVISORY:
The PUBLIC is hereby advised that effective 12 March 2018, the NBI will be charging a fee of ONE HUNDRED THIRTY PESOS (Php130.00) per clearance certificate from the original ONE HUNDRED FIFTEEN PESOS (Php115.00) to comply with Documentary Stamp Tax (DST) rate adjustment.
This is pursuant to Republic Act No. 10963, otherwise known as the “Tax Reform for Acceleration and Inclusion (TRAIN) Law” and Revenue Regulations No. 4-2018 issued by the Bureau of Internal Revenue (BIR).
–NBI MANAGEMENT
NBI Clearance Validity
NBI Clearance is only valid for 6 months to 1 year. This is because there is no assurance that you will not be involved in any criminal cases in the next months after the acquisition of your clearance.
Step by Step Guide on NBI Clearance Online Application 2021
1. Go to the NBI Clearance Online Application Website
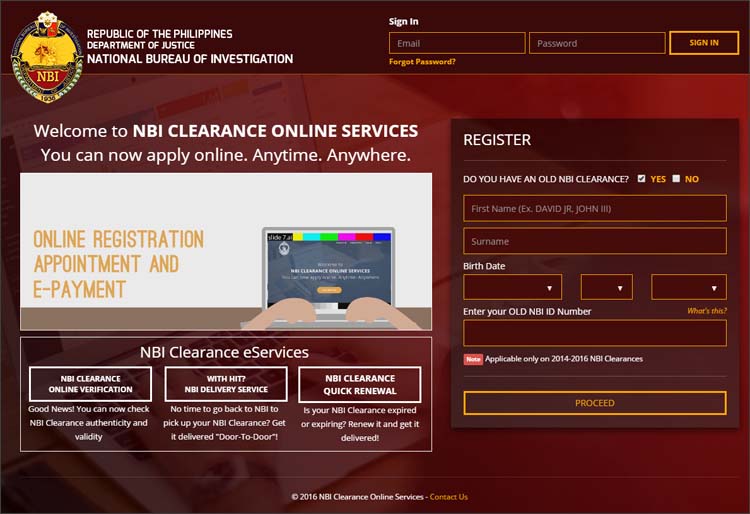
The very first step to begin with the NBI Online Application is to visit their official website for NBI Clearance. Go to https://clearance.nbi.gov.ph/.
2. Register a New Account
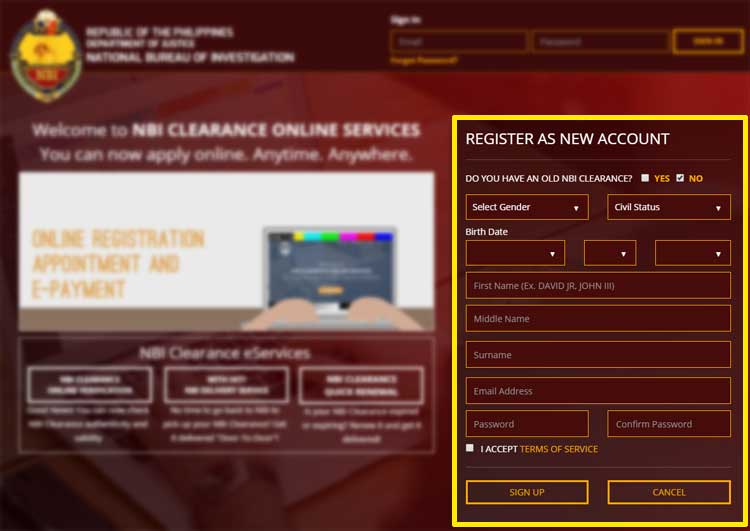
The landing page looks similar/exactly (if no changes have been made) to the image above. What you want to do is to Register A New Account. In the first question, DO YOU HAVE AN OLD NBI CLEARANCE? Assuming this is your first time, choose NO. Then fill-up the registration form with the correct information.
Make sure to input an active email address since an account activation email will be sent to the email address afterwards. Make sure to memorize your password, too. Check the box for I ACCEPT TERMS OF SERVICE ACCEPT SIGN UP. A confirmation pop-up up message should appear to make sure the information is correct and you are willing to proceed. Then, click OK.
3. Sign in to your NBI Clearance Account

After you click the SIGN UP button, an account activation email should be sent to your in few minutes. But you can skip this step if you don’t receive any email from NBI. Sign in to your account by entering your email address and password on the sign-in form above. Then click SIGN IN button.
4. Fill-up and Save the NBI Clearance Application Form
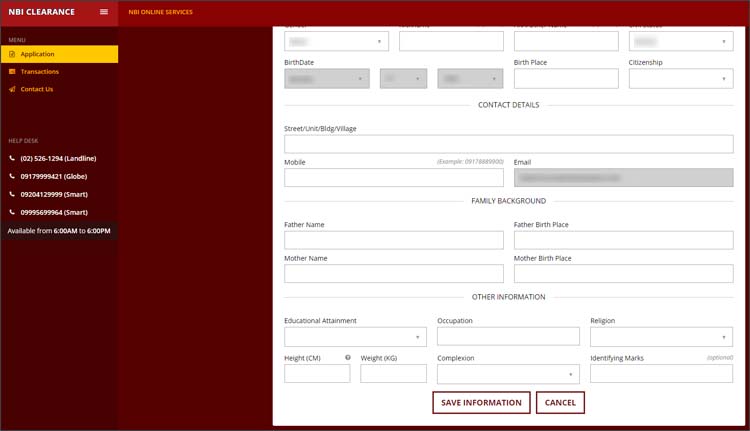
In your account overview after you have signed in, the NBI Clearance Application Form will be shown. Fill-up the blank fiends but you can’t change anymore the permanent one’s. Those are the details you entered in the registration form. Then, click the SAVE INFORMATION button.
5. Apply for Clearance and Enter PIN CODE
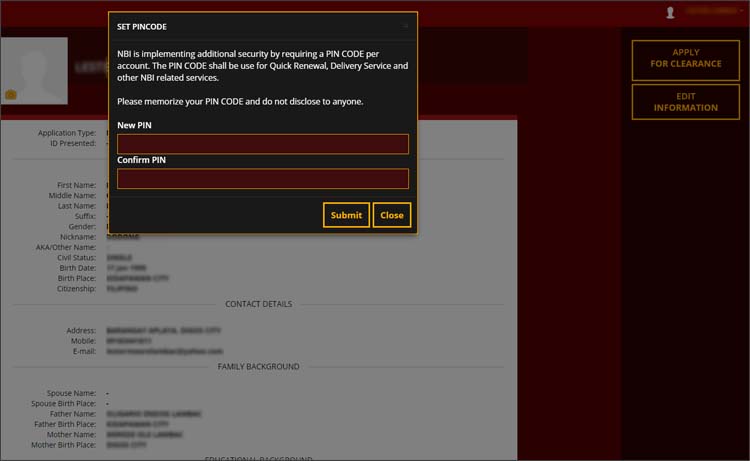
Click the APPLY FOR CLEARANCE button located at the upper right corner of the webpage. After clicking, you’ll be asked to set-up a PIN CODE for your NBI Clearance Account. Set a 6-digit PIN CODE of your preference. Memorize it or put in on paper.
6. Enter the ID to be Presented
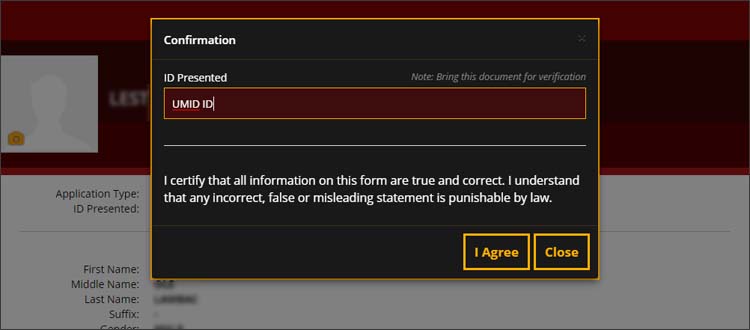
This is to confirm on what ID you will be showing upon claiming your NBI Clearance in the office. Enter at least 1 Valid ID.
7. Set an Appointment Schedule
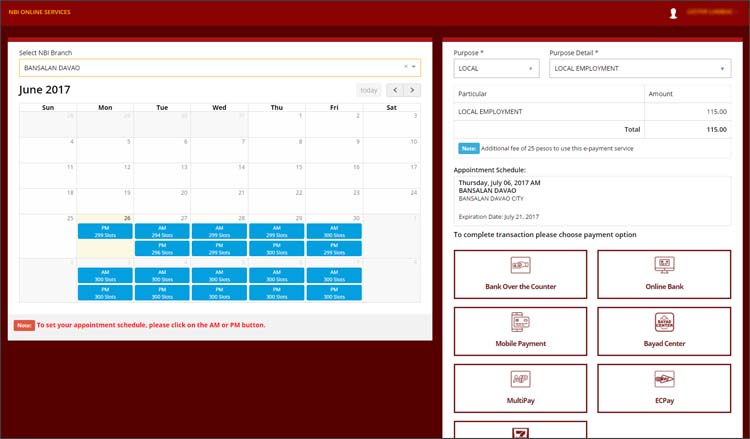
The next step is to select an NBI Branch where you will claim your NBI Clearance. You can scroll below the Select NBI Branch dropdown menu and find the NBI Branch in your area.
Then, chose the date of your appointment or the date where you’ll go to the office. The blue boxes separated by AM and PM are your choices which means slots are still available. For example you want to go to June 30, 2017 in the afternoon, chose the lower blue box which shows PM in June 30 calendar.
Next, select the Purpose of the Clearance is it to be used in Local or Abroad. If you are using it as a job requirement in your town, chose LOCAL for the Purpose Field then chose LOCAL EMPLOYMENT for the Purpose Details Field. The amount for the clearance should be shown.
8. Select Payment Option
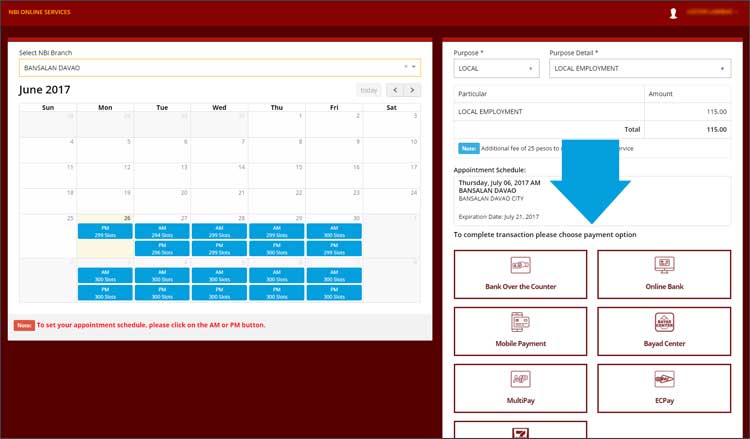
Lastly, select the mode of payment to complete the transaction. Options will be given and you can pay through Bank Over the Counter, Online Bank, Mobile Payment, Bayad Center, MultiPay, ECPay and 7-Eleven Branches.
The most common mode of payment is through 7-Eleven Branches or Bayad Centers. However, you can also pay at the NBI Clearance Center/Office.
The payment options are just for you to conveniently pay for your clearance beforehand so you won’t have spend long waiting time when you personally go to the center/office to get your clearance.
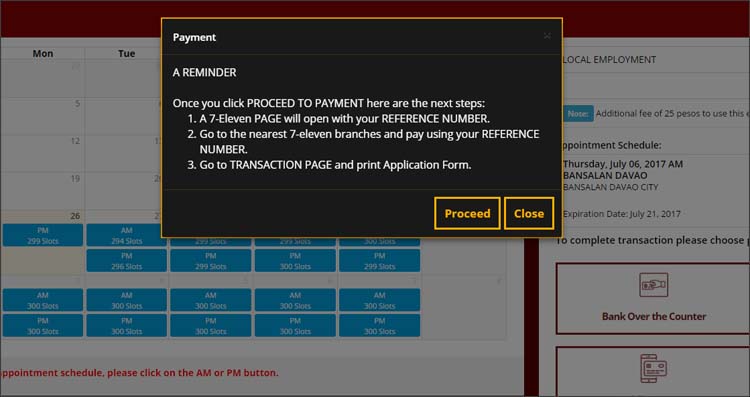
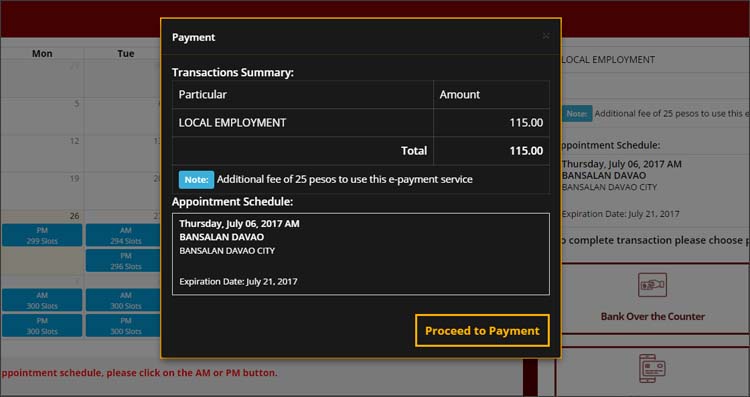
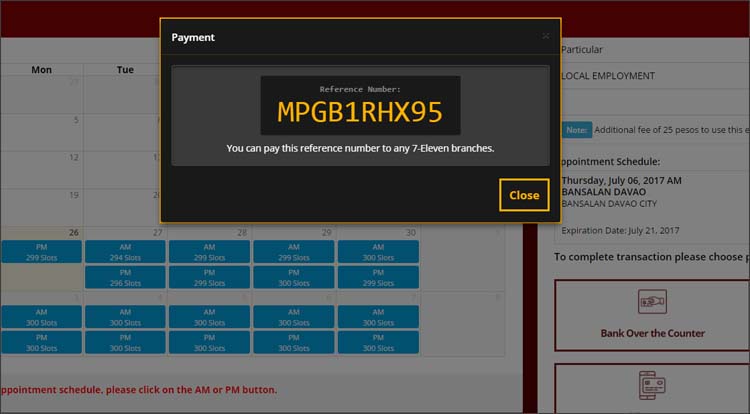
A Reminder and Transaction summary should be shown then the Reference Number to be used for payment.
If you chose to pay through 7-Eleven Store, just tell the cashier you are paying for an NBI Clearance. Give the REFERENCE NUMBER and Payment of ₱140 (₱115 NBI Clearance Fee + ₱25 Electronic Payment Service Fee).
9. Print the NBI Online Application Form
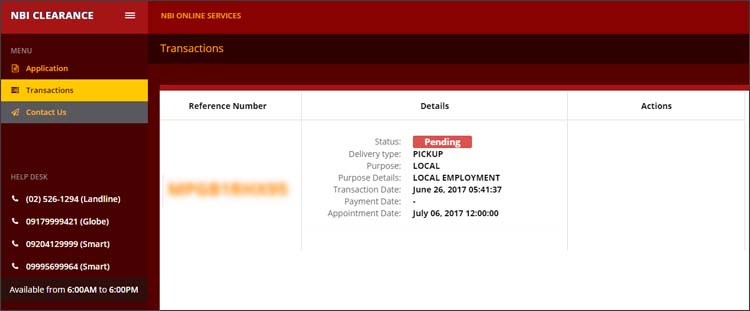
After the payment has been made, wait for at least 1 working day for the payment to be validated. Log-in to your NBI Clearance Account Online then go to the Transactions Menu located in the upper left corner of the webpage.
If the status is still PENDING, wait for it a little longer. If the status is PAID, click the DETAILS button and PRINT IT.
The final output of the NBI Online Application is the Printed Application Form with Reference Number. However, if you cannot print the application form, you’ll be fine as long as you have your Reference Number. Either you write it on paper or take a picture of it using your phone. Then, proceed to the next step.
10. Go to the nearest NBI Branch/Center
After you have done the NBI Online Application, the next thing you have to do is to go to the nearest NBI Branch/Center in your appointment date. Make sure to wear proper attire and bring the requirements.
In the NBI Online Application, there is a confirmation on what ID you will present in the NBI branch. Make sure to bring that one and bring other ID just in case.
11. Proceed to fingerprint scanning and photo capturing
Politely tell the officer in charge, a guard or someone in the office that you want to get an NBI Clearance and you have already applied online (make sure to show your printed form to justify your claim). Most of them just want to check the Reference Number in the printed application form.
If you don’t have the form, as long as you have your Reference Number written on paper or captured on your phone, it’s valid. You will then be guided to fall in a queue (if there’s any) to proceed for biometric fingerprint scanning and photo capturing.
12. Get Your NBI Clearance
When you are done, you’ll wait again for a while for your name to be called. That’s when your NBI Clearance be given to you fresh from the printer.
You’ll be asked to check the credentials (name, address, age, gender, birthdate, etc.) before you leave. If there are errors, politely tell the officer and it will be done fast.
In rare cases, if you have a “HIT”, that’s when you will be given a small slip and asked to come back to the office in few days (as printed on the slip) to claim your clearance or to settle any issues.
That’s the step by step guide on How to get NBI Clearance in the Philippines and a walk-through of the NBI Clearance Online Application. Hope it made you understand and see the bigger picture or overview of the entire procedure.


Paano po maka kuha ng NBI gamit ang cellphone?
I can’t submit my form. I can’t leave my middle initial blank, I tried using “dash” or N/A and still they can’t accept. I can’t leave it blank. What should I do?
The status is paid but it can’t be printed because there is no button in the details.
same with me. I’ve already paid the amount through 7-eleven but no button showing under “Actions”.
Hi, me too! What happened to your application? Thanks!
Bakit po kapag nakapili na kami ng schedule, di po lumalabas kung local or abroad. For abroad po sana iaaply kaso local pa rin and di mapalitan.
Parehas po tayo, nung isang araw lang ako nag apply online pero lumabas sa purpose nya local then purpose detail multi-purpose, kaya di ko alam kung paano yun.
Since October 2017 po ata nagstart, new law ni Digong na Multipurpose na ang NBI. Para isahan na ang pagkuha. Goal niya mapagaan ang buhay ng mga Pinoy na kumukuha ng NBI.
So we can use ONE NBI Clearance to any purpose po.
Okay lang po na nag apply ako last night ng clearance then tomorrow ko babayaran and same day din din po ako mag apply?
Pwede po ba ang voter’s certification? Kasi wala na akong ibang valid ID. Meron akong TIN ID, yung voter’s ID kasi di nadaw magrerelease yung COMELEC kasi National ID na po daw ang irerelease nila sa susunod.
Kasi po multi-purpose na po ang NBI ngayon. Pwede na sya gamitin local and abroad.
Nag try ako mag register pero hindi makaproceed kasi yung OLD NBI Clearance ko 2007 pa eh yung nakalagay sa online registration applicable for 2014-2016 lang. Ibig sabihin ba nun NO ang click ko imbes na YES? Need ko na makakuha ASAP ng NBI sana may makatulong sakin. Thank you in advance.
I missed my scheduled appointment due to an emergency but i have paid the fees already. There was no validity date indicated in my application form. What should i do? Should i register and pay a new? Thank you.
Bakit po walang apply clearance button sa taas? Paano po kayang gagawin?
Hindi ko po nakuha yung NBI ko noong Friday. Bale pinababalik ako ng 16 Friday schedule ng release. Makukuha ko ba sya sa Monday o maulit na naman po ako. Thanks!
Walang print button yong sa Details pag nabayaran na sa 7-11? Iscreenshot nalang? Di ko makita yong print option.
Okay din I screenshot mo nalang sir. Pero make sure may Reference Number ka. Usually, yun lang naman tinitingnan nila.
Hi, can I change my schedule of appointment from AM to PM?
Ang inilagay ko sa status ko ay “Married”. Pero ang nag-appear sa online application ko sa last name ko ay ang apelyedo ko nung dalaga pa ako. Hindi ba dapat ang mag-appear ay ang surname ng husband ko sa last name ko? Kaya hindi ko itinuloy ang registration. Bakit po ganun?
Hello po mag register nako then nag select appointment date, bakit ayaw ma click yung date na gusto ko? Tsaka di ko makita kung saan dun yung AM at PM patulong please.
Pwede ko bang ibigay nalang yung resibo galing sa 7/11? di ko kase maiprint eh.
Yung error sa Local or Abroad yun po yung problema. Hndi kami makakuha kasi kailangan namin for abroad. Bakit local lang po yung andon? Dapat my dropdown menu.
I have a couple of questions please :
1. I applied last year. Registered online as NEW. Now I am going to renew but there is no way to change the application type in the form from NEW to RENEWAL. Or this doesn’t matter?
2. Luckily I am off today April 5 and tomorrow only. I work weekdays and office hours making it so hard to get an free time like today. I thought I was gonna be able to process my NBI. Went online and found out the latest sched is not until April 11. IF I PAY THE 11TH SCHED AND PAID FOR IT, CAN I WALK IN TODAY SINCE BAYAD NA DIN NAMAN? Can we do that? It’s such a hassle this scheduling system when the dates available are just too far and collides with office workers unless you will have a Saturday schedules on.
What if the person is not in the Philippines for biometric finger print and photo capture?
“The status is paid but it can’t be printed because there is no button in the details.” –
For those who encountered this, try to resize yung window ng browser po. Size ng cellphone at least para lumabas yung details na button.
Kapag po nadoble po ung appointment, babayaran pa rin po ba parehas?
Hi paano po pag yung lumalabas na purpose is multi purpose clearance, hindi ko po sya napalitan ng for local local employment. Ano po ba ang gagawin?
Walang set up ng PIN Code ng nag-apply ako for clearance? Ang lumabas lang ay ID presented.
Nag apply po ako dito kaso nalito ako kasi bakit walang nakalagay purpose local or abroad? Tapos paano sya ma ipa print?